What's the Best Way to Unlock Your iPhone?
I remember all the hubbub when Apple first announced Face ID back in September of 2017. There were countless articles and thought pieces criticizing Apple for the terrible experience its new security technique was about to create. Instead of just pressing on your iPhone’s Home button, a natural task as you pull your iPhone out of your pants pocket, jacket, or bag, you’d have to pull your device up to eye level, stare at it, and then go about using it as normal.
And yet, Face ID seems to have worked out well for Apple. Or, at least, the company is sticking with facial recognition for now, as none of the iPhones it’s set to announce next week are expected to have any kind of in-display fingerprint reader. Whether that’s a technical limitation Apple can’t climb in time for this year’s batch of iPhones, or Apple will eventually abandon Touch ID for good, we’ll just have to wait and see.
In the meantime, here’s a look at the benefits and drawbacks of the iPhone’s various unlocking mechanisms—from passwords, to fingers, to your big fat head.
Advertisement
Choosing an unlocking technique
Just to preface, I’m taking most of my screenshots from an iPhone 8 Plus running iOS 12, because
I’m too cheap I don’t need an iPhone X. The steps and settings should similar for your iPhone, assuming you aren’t using an iPhone or OS from five years ago or something.
Also, Apple doesn’t give you nearly as many options for unlocking your device in iOS as Android users will find on their smartphones. Them’s the breaks.
Start by unlocking your device and tapping on the Settings app. From there, scroll down a bit until you see Touch ID & Passcode (or Face ID & Passcode). Tap on that.
Option 1: Passcode
Convenience: Notifications and speedy device access
Security:
Security:
Odds are good you’ve already set up some kind of numeric passcode you can use to log into your device—likely during those times it doesn’t recognize your face, fingerprint, or when you
- Turn on or restart your device
- Press the Home button or swipe up to unlock your device (you can change this)
- Update your software
- Erase your device
- View or change passcode settings
- Install iOS Configuration profiles
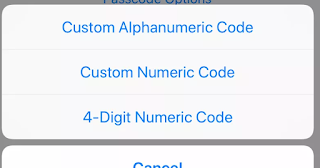
 To change the size of the passcode you’re using, scroll down a bit on the Touch ID & Passcode screen until you see “Change Passcode.” Tap that, enter your current Passcode, and you’ll be able to set a new one. If you want to go from six digits to four (or vice versa), tap on the “Passcode Options” link.
You can also set up Option 2: a password. I’d give this its own section, but setting it up is too easy. Instead of picking a differently sized numeric code, select the option for a “Custom Alphanumeric Code” or “Custom Numeric Code,” and enter any string of numbers and text (or just numbers) you want. While a killer passcode might be inconvenient to type in, it’ll be a lot more secure than a four- or six-digit PIN (especially if you’re using a number with some kind of significance that others could easily guess).
Option 3: Touch ID
 Convenience: It doesn’t get better than Touch ID
Security: Don’t let your friends make molds of your fingerprints
If your device supports it—that’s any iPhone with a Home button since the iPhone 5S or any iPad since the iPad Air 2—Touch ID is a great way, perhaps the best way, to unlock your iPhone. It’s speedy and secure, and you’ve probably already set it up on your device. (Apple prompts you to enable it during the first few screens you see on a new iPhone or iPad.) If you skipped past that part, you’ll be able to register your fingerprint via the same Touch ID & Passcode section of your Settings app I referenced earlier.
You can register up to five fingers, so make sure you test out all the ways you typically grip or grab your phone to make sure you haven’t left any piggies at the market. And once you’re done registering digits, scroll to the very bottom of the Touch ID & Passcode screen and make sure “Erase Data” is selected. That way, if someone is trying to break into your device, it’ll eventually erase your iPhone if they get to 10 unsuccessful attempts in a row. That’s annoying for you—if they make it that far, since iOS will start increasing the time between attempts for every successive failure—but a lot safer, in general.
Option 4: Face ID
Convenience: You’ll have to look at your iPhone a lot
Security: Your evil twin is excited to see your new smartphone
Security: Your evil twin is excited to see your new smartphone
 If you have an iPhone that supports Face ID—currently the iPhone X, and undoubtedly some of the new, strangely named models Apple releases this month—then your Settings screen will have a “Face ID & Passcode” section instead of a “Touch ID & Passcode” section, since your device has no Home button to speak of.
You won’t be able to register multiple faces for your iPhone until the official release of iOS 12 (assuming you aren’t running the public beta, that is). This will be the device’s “Set Up an Alternate Appearance” option, which is really meant for you to register a different version of yourself rather than a different person entirely. It’s a fun little hack, assuming Apple doesn’t tighten up this functionality and only allow an “alternate appearance” for a face that resembles yours.
If you want to log into your device a little faster, you can turn off the “Require Attention for Face ID” option within the “Face ID & Passcode” section. You should then be able to unlock your device with a bit of a side glare, rather than staring directly into your iPhone’s soul.
What's the Best Way to Unlock Your iPhone?
 Reviewed by Gamehacks 007
on
September 08, 2018
Rating:
 Reviewed by Gamehacks 007
on
September 08, 2018
Rating:


